HeartWork Organizing

Helping you find peace and purpose through organization and design

Why Remove Pictures when Staging March 27, 2012

Filed under: Staging — HeartWork Organizing @ 2:00 pm
Tags: ,

Removing personal pictures from your home is one of the first and easiest things you’ll do when staging your home for sale.  There are three reasons you want to remove personal pictures from your home when it’s on the market.

1.  You want to leave room for the buyer to imagine their family, not yours, in the home.  First impressions happen very quickly, and it’s just easier for a potential buyer not to have to erase an image of your family so they can picture themselves at home.  Only about 10-20% of buyers can imagine the changes they want to make to your home.  Don’t stress the other 80% who can’t.

2.  Buyers love to wander over to your wall or table of family pictures to see if they know you.  It’s only human; we want to connect.  They’ll want to see if they know you from high school, if you look like them, or if your kids are about the same age as their kids.  Any time they spend trying to make these connections with you, they aren’t making the connection with the house, which is exactly what you need to have happen.

3.  It’s just prudent to safeguard your family.  Buyers are strangers, after all, and there is no reason that you need to let strangers know how old your kids are, what activities they participate in, and what your family likes to do in your free time.

Most sellers don’t want to remove family photos because they think that means removing the frames and necessitating a new paint job.  Not so.  One easy trick is to replace family photos with landscape art that goes with your decor.  In this shot, you can see that the homeowner doctored  a family hallway montage, and now it features some peaceful seaside shots.  Still pretty, still framed, but now something that draws you through the space to the next beautiful room, instead of slowing you down in the short hallway.

easy staging tips

If your home is on the market, and you haven’t yet taken down or swapped the family photos, what are you waiting for?


Kitchen Remodel vs. Facelift January 19, 2012

Filed under: One Day Interior Redesigns,Staging — HeartWork Organizing @ 2:12 pm

Did you know that Remodeling Magazine produces a helpful Cost Vs Value report every year helping homeowners to determine the relative value of their home remodeling projects?  One interesting fact is that a “Minor Kitchen Remodel” has typically recouped greater (72%) return on investment (ROI) over a “Major Kitchen Remodel” at 66%.  Those numbers have been consistent for at least the years I’ve been watching them.  So when another mom friend with two children about the same ages as mine was asking my advice on updating her kitchen, I asked her to seriously consider what the advantages to complete gut would be over a cosmetic remodel.

In the end, she decided to go with a minor remodel, updating the oak cabinets and oddly added crown molding with an antique cream finish.  She used the Rustoleum Cabinet Transformations product that has been getting some attention over the last year.

kitchen before, Rustoleum Cabinet Transformations

We both love this outcome because they saved a ton o’ money, and because their perfectly solid oak cabinets are still in use, not in the landfill.  And, check out how the paint unified the crown molding, and made it look like it belongs to the cabinets.

She’s currently working on painting the island and swapping out the island counter for something a bit more updated.  But, wow, what a great transformation!  And I love the new cabinet pulls.  Great choice, for a bit of contrast.

Here’s what she said about the Rustoleum Cabinet Transformation product:  It took me about 1 week  to do, mostly while the kids were sleeping.  It isn’t hard, just very time-consuming.  The kit said it would only take 2 coats of the base coat, but it actually took me 3.  It is totally well worth it in the end.  My only minor concern is durability.  I noticed a couple of chip on the cabinet by the trash can…..it is very easy to touch up though.  I will say that I did drop a few of the cabinet doors on the garage door when I was trying to carry them in the house to reassemble.  Amazingly, they were okay!  Last night I started the island.  I was waiting to figure out what color but I ended up doing it the same color.  I didn’t feel like getting a new kit for an accent color since this is temporary.  All in all, it only took me 1 large kit to do the kitchen.

This would also be a great, economical option for staging an older home to sell.  This antique cream finish is very current.

If you have any questions about doing this kind of project, or any firsthand experience with this product, I would love to hear it.


How to Sell A House Naked June 5, 2011

Filed under: Staging — HeartWork Organizing @ 11:06 pm

This might be surprising coming from a professional home stager, but not every house should be fully and completely staged.  Especially for adult children who sell their parents homes or when a family must leave due to job transfer, selling an empty or “naked” home might be one viable option.  If you decide to sell a house without staging it, though, here are 9 things you should be sure to do.

Naked House for Sale

I visited a home this weekend that is for sale, and it is completely empty.  (If this link is broken, that means the home is off the market, but keep reading.) This home has so much character in the architectural details, close proximity to neighborhood services, and amenities on the lot like a garage and rented carriage house.  The family recently did some major upgrades like refinishing the hardwood floors and replacing the roof.  They cleared everything out except the window treatments.  They made sure it was clean and move in ready.  Although there are some great changes that could be made by a future buyer, it’s not cost effective to remove wallpaper on three floors and replace a kitchen.  Quite frankly, there are so many wonderful remodel scenarios, my head is still spinning.  Although the family could command a higher price and sell immediately (in a neighborhood where same-day sales happen frequently), they are opting to save their mental energy and price it appropriately.

If you go this route.:

Be sure it is deep cleaned.  There is a difference between walking into an old home that has “potential” and one that has “character.”  You want to be the house where people stand and dream about how they can easily make it their own, not where they feel they have to remodel just to get rid of the grime.

Remove every personal item, especially pictures.  Don’t leave that family portrait just because it always hung there while you were growing up, you think it makes the house look more lived in, or because it is covering a crack or stain in the wall.

Nothing says character like a curved wall!

Leave the lighting.  60% of your showings might be in the evenings and on weekends, so be sure to leave lighting in the room.  Buy floor lamps if you need them.  They are a cheap investment.

Make sure all the repair and maintenance items are cared for, and be sure the place is really clean.  Showers and bathroom caulk are often telltale spots that show how the home is being maintained. All clean and clear.

Even if you think or know the market would like to see an updated kitchen or bath, if it’s not in your budget, don’t try to do the job halfway.  Just be sure the space is as open, bright, and clean as it could be, and price appropriately for the market and the required upgrades.

This kitchen is ready for an upgrade, but is also move-in ready.

Know your stuff.  Be ready to talk to realtors or potential buyers about important details like taxes, major systems like electric, roof, and HVAC, and the neighborhood.

I couldn't get in to see the carriage house apartment. Be sure buyers can access all areas of the property during open houses. It just might seal the deal.

Clear out every space, especially basements and garages.  Don’t use your hot property as your storage locker.  You want people to be able to know that these spaces are safe, dry and cared for.  It gives the impression that the rest of the house is cared for, as well.

Clear basements, garages, and storage spaces completely.

Highlight fabulous positives to offset the negatives you may have to live with.  In this case, the rooms are big and have newly resurfaced floors, which offsets the fact that every room is wallpapered.  The wallpaper may not suit everyone, but it is neutral, clean and in generally good condition.

Fabulous floors!

Did I mention cleaning?  HomeGain’s surveys report that cleaning a home prior to sale is the best bang for your buck, with a return on investment of nearly 600%,  especially in an older home.  This property was 120+ years old, but all of the surfaces were sparkling.  Move-in ready is what you want.


Spic and span

Every home, every neighborhood and every sale is unique, even if you are in a modern development.  Apply the strategy that appeals to you, has the best ROI, and will bring you the best results.


Stage, Sell, Save the Window Treatments March 25, 2011

Filed under: Staging — HeartWork Organizing @ 8:10 pm
Tags: ,

You might wonder if there is a rule about window treatments when selling a home.  The first time was involved with someone selling their home (I was 16), the seller told me point blank that it is expected that the window treatments go with the old home.  Not so fast. There is no hard and fast rule, in fact.

Plan on leaving the window treatments if:

  • They are hard wired and custom-fabricated hard treatments (such as plantation shutters), but be sure to include them in the listing description as features of the home.  Custom fabric treatments never have quite the resale value we’d like them to have, since they are usually taste-specific and can be outdated in just a few short years.
  • You no longer like the style or you are planning on replacing most of your furnishings in your new home.
  • You have a comfortable budget to bring new window treatments in to the new home.
  • You don’t have skills or time to uninstall and then reinstall them in your new home.
  • The home might sit vacant for sale, and would look uncared for if the windows were bare.

On the other hand, consider taking the window treatments with you if:

  • You have a very limited budget for new window coverings, and think that you might be able to re-use some of the window treatments.  Even many honeycomb shades can be rehung in a new home, but be sure to keep the original brackets and screws taped securely to the blinds in transit.  You may not use all the blinds, but you might be able to outside-mount a blind that was previously mounted inside the frame, for instance.  
  • You will be keeping most of your furnishings and accessories in the new home, which means your window treatments will likely coordinate with the look.
  • You no longer love the fabric, but you still like the hardware (which can often be as expensive or more so than the fabric).
  • You know the house will not be sitting vacant.
  • The styles and fabrics are current enough to be used in other places in your new home.  Floor length window panels, which are the trend today, can often be redeployed in many rooms in a new home.  They can be even be updated with embellishments to fit in with alternate decor.
  • And perhaps most importantly, consider excluding the window treatments in your listing, even if you have no real desire to take them with you.  This gives you an easy negotiating point with the buyers.  Many buyers today are asking for multiple, even sometimes outrageous, conditions to close a deal.  Sometimes these conditions are presented even after a “final” agreement has been reached, but before closing.  If you exclude the window treatments and the buyer demands them, you can easily offer them up and appear as accommodating as possible.

Whatever you decide to do, be clear about the window treatments in your initial listing to promote a good relationship with agents and buyers.


Trend Spotting: Three Design Trends for Today’s Homes July 20, 2010

Filed under: One Day Interior Redesigns,Staging — HeartWork Organizing @ 6:26 pm
Last month, survey results showed that 100% of respondents said they sometimes go to real estate open houses just for fun.  It’s a great way to get new design tips for houses like yours.  Last weekend I visited a new/old house that was just redone.  It was formerly a 50-year old ranch house, but now is a completely new 3-story beauty.  Talk about raising the roof!  I have to admit, I was more impressed than expected when I walked through.

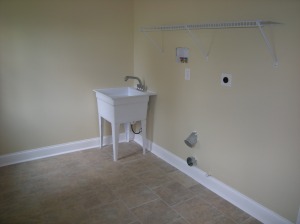
The home beautifully incorporated many of today’s home trends.  Three design trends that I particularly loved were the laundry room, use of contrasting neutrals, and the butler’s pantry. Does this look like the guest bedroom to you? 

Guest room? No, even better. Laundry room!

From the doorway, this looks to be about the size of my childhood room.  Today’s builders are getting smarter.  Laundry rooms are bigger, with natural light, and are smartly located next to the bedrooms, where much of the laundry is generated.   Notice the high quality porcelain tile and warm paint color.  The next picture shows the appliance side of the room.  When the owners move in, they will likely add energy efficient appliances, cabinetry above the appliances, window treatments and accessories to make this room just as nice as the rest of their living space.    

Trend 1 - Luxurious Laundry Rooms

Trend 1 - Luxurious Laundry Rooms

Trend number two is the use of what I call “contrasting neutrals”.  Anyone who lived through the eighties might still be thinking in terms of beige for neutrals.  But you can see in this shot of the master bath that by sticking to a single, natural color palate, the builder successfully brought in a strong neutral in the dark vanity, complimented with a medium tile choice and a lighter wall color.  These are all technically neutrals, and I could make a case for decorating with either warm or cool accent colors.  The new owners aren’t forced to pick just one color.  

Trend 2- Contrasting Neutrals - Bath

Trend 2- Contrasting Neutrals - Bath

Similarly, in the kitchen, the palate consisted of all neutral colors, but they ranged from black cabinets on the center island to white cabinets to grey in the back splash tile to gold and grey in the granite countertop.  This type of color selection in the finishes is ideal for a builder because it can appeal to a wide variety of potential owners, but still allow the new owner to bring in personal touches and color through accessories, if they want.  A homeowner who renovates with these types of finishes has the best chance of a wide appeal at resale time, as well, without sacrificing style while they still own it. 

Trend 2- Contrasting Neutrals - Kitchen

Trend 2- Contrasting Neutrals - Kitchen

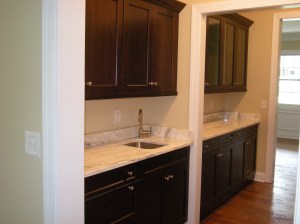
The third trend in new or renovated homes is actually a nod to the past.  Check out this butler’s pantry.  While the kitchen is certainly an adequate size, by turning a few feet of hallway in to a butler’s pantry, the builder creates a wonderful space for today’s families.  Many would use the upper cabinets to replace a traditional dining room hutch as a place to store fine dishes.  Some would be reeled in by the possibilities of entertaining.  Many would love to have additional “stash” space that isn’t in the high traffic areas for household papers that always seem to end up in the kitchen.  A reach-in pantry behind doors faces the cabinetry, so everything is within easy reach of the main kitchen.  What a dream! 

Trend 3 - Butler's Pantry

Trend 3 - Butler's Pantry

This home, happily, sold the same day I previewed it.  This is proof yet again that if you tap in to today’s trends and buyer desires, the right property will sell, no matter what the market is doing.  

My thanks to Dan Cosgrove (dan@visionaryres.com) at Visionary Realty Services, Inc.  for allowing me to share these photos with you. 


New Windows? What to Look For Whether Selling or Staying May 19, 2010

Filed under: Staging — HeartWork Organizing @ 2:25 am

Don’t wash those windows.  Replace them!  There are some real benefits to replacing windows in older homes, but like any home improvement project, there is a lot to consider. 

            We recently replaced all of our windows on our nearly hundred year old home.  This story starts with windows that were single pane, drafty, and mostly painted shut.  Storm windows had been added to these original windows sometime during the last 30 years, but that made them even harder or impossible to use and clean. Some of the windows also blocked egress in a fire, and that was a real problem for me.  The last straw was when we noticed that the interior paint on the window nearest the baby’s crib was peeling worse than a bad sunburn at the shore.  

We are not novices. We’ve replaced windows in all three of the vintage homes that we’ve owned.  The first time, the choice was driven by function, and a quality vinyl window in our price range was just the ticket.  The second time, we installed vinyl windows with our own hands in just a few rooms.  But in our current home, we had specific requirements.  Because we wanted to maintain the architectural integrity of the home, we were shopping for a certain style and caliber of window, and we knew that vinyl was not going to be the answer.

When you really start to investigate this market, you might be surprised at the range of options.  Materials range from all wood with various types of cladding to composite products that may or may not contain wood.  Styles vary widely, even within the same window type, and just the options for window grids (also known as grilles or mutton bars) or hardware can be overwhelming.  Color options seem endless.  And installation processes and providers are a whole different set of discussions.  All of these options will vary the range of prices for a single window from $200 to nearly $2,000.

We chose to interview four top brands that were available in our area.  Some of them had been recommendations through friends, and some of them were top names that we wanted to learn more about.  We also researched the brands through Consumer Reports’ November 2009 report.   We read online comparisons like those at http://www.windowhelpbook.com, which confirmed my suspicion that our payback was not going to be as high as we’d hoped.  We visited showrooms and had vendors in to our home.  If this sounds scary to you, get some help on how to hire a contractor

Even Uncle Sam wants you to upgrade your view.  Because the energy savings can be pretty good (I hesitate to say significant), you may be eligible for up to $1,500 in tax credits (this is different than a deduction) if you install qualifying purchases by the end of 2010.  In fact, the typical energy savings for a whole-house replacement of windows hovers somewhere around 20% annually.  It makes sense to do the math, so, let’s do the math. 

  Current costs Reduction with new windows
Heating & Cooling costs annually $2,400 assumed ~($480/year)
IRS energy tax credit through 2010 n/a ($1500 max)
Cost of maintenance (painting existing window exterior) $2,000 every 5 years assumed $0, assumes maintenance free capping
Cost of touch-up painting, not included in typical installations n/a $500
Average nationwide investment $0 $12K-$18,000

 Using the numbers above, the payback period for the windows, before they start to pay for themselves in energy and maintenance savings, is somewhere between 19 and 35 years.  I had to think about this as I was ripping out 100 year old windows!

The Hanley Wood Remodeling 2009/10 Cost vs Value report pegs ROI on replacement windows at somewhere around 77%.  This is actually a pretty good ROI compared to other home projects, but it is also another way of saying that you would lose about 23% of your investment right away in a resale. This is a project you want to take on if you’ll be in your home a while or if your current windows would actually be an impediment to selling your home. 

Like I said, this is not a slam dunk.  It’s not as if your energy efficient windows are going to start saving you tons of money right away. 

But wait…there’s more!  Just this April, 2010, the new US Environmental Protection Agency (EPA) regulations kicked in regarding practices designed to minimize the exposure of lead hazards in homes built before 1978.  If your home is one of these lucky ones, you can now expect to pay around another $150 per window for the training and standards that your contractor must follow to contain potential lead hazards.  These include personal protective clothing for the installers, and extensive plastic tenting for containment of dust and debris, as well as cleaning protocols for your home.  This isn’t optional, but mandatory for all contractors, and they face stiff fines if they disregard the new laws.

In the end, we did decide to replace our windows.  Because we were doing straight replacements, meaning that we were using the original openings for all of the windows instead of increasing window openings, things were able to go rather quickly. We took the calculated risk of allowing the work to be done while we were away during a week, figuring this would be the easier way to do construction in a home with two small children.  Even though we had a pre-install walk through and one full day when we were on-site at the start of construction, we were disappointed to come back to a full list of problems.  They included capping that was done contrary to the work order, sloppy caulking, visible gaps in between the windows and the walls, broken hardware, and two casement windows that had been swapped, leaving them both to open in the wrong direction.  Needless to say, we were disappointed. 

What we did like, though, was the suggestion to include full screens on our double hung windows, allowing us to safely have the top sash open in rooms where children will be playing.  The site was clean when we arrived home.  The look of the windows is ideal. And our contractor immediately responded to our requests.

Although we’d like to imagine that every home improvement project gets done right, on time, and in budget, that’s not always the case.  But the key is to keep the lines of communication open with your contractor, document the problems, specify in writing clear requests for repairs or completions, and most importantly, withhold half or more of the full payment until the work is completed to the terms of the original contract. 

I hope to be able to append this post within a month or so with happy news about the final outcome of our window project.  For now, we are happy that we can open our windows and enjoy the spring breezes.  If you decide to set out to bring the outside in with new windows in your home, I hope that our experience and the resources found here will help you through.


Stinky House: How to Get Rid of Nasty Odors When Staging May 4, 2010

Filed under: Staging — HeartWork Organizing @ 8:39 pm

One of my professional groups recently had a thread about what to do about stinky homes when staging to sell.  Without a doubt, this is one of the biggest and least discussed problems when staging.  I have had experience with this, and it takes a little strategy.  First, if you are putting your home on the market, ask a friend (but not one who is at your home all the time) to come and honestly help you assess smell.  You don’t need tact here, you need candor.  All homes smell like something.  What you strive for is a neutral to slightly yummy odor.  Anything less will be a turnoff to someone, and you want to get ahead of that problem.

First, do all the basic stuff.  Vaccuum and clean, open the windows and air things out, take out the trash and wash linens.  If you smoke, stop smoking.  Ok, I know this is easier said than done, but I had to say it.  Even smoking only outside will not fix the problem, as odors come in on your clothes and accessories.   Make sure the cat box is cleaned more than daily, and sign the dog up for a weekly bath at the local pooch spa.  Take off vent covers and vaccumm inside vents, and replace or clean filters.  Have the carpets deep cleaned, and heavy drapes removed or professionally cleaned.  Try adding a light fresh scent, like a single potpourri or lavender scent.  Be careful, because the goal is to not actually have a scent, but just leave a positive “blink” impression.  My favorite trick is to boil some cinnamon, cloves and nutmeg on the stove while I’m cleaning the day before an open house.

Next, get serious about really problem odors by tackling large surfaces that hold odors.  If painting, you can seal the surfaces first with a primer, then paint the color.  Just replacing carpets may not be enough if there is heavy smoke or pet damage.  Again, you may need to seal plywood floors with primer before replacing both the carpet and padding.  In the case of hardwood floors, if damage is extensive, you may need to sand and re-seal with polyurethane.   If the odor is still pervasive, be sure to remove everything from closets and move off-site, if at all possible.  Clothing will retain stale and smoke odors.

Then it is time to bring out the big guns.  My tool of choice is an air purifier called Fresh Air by EcoQuest.  This is a single unit, usually about the size of a small stereo, that treats the whole house by purifying the air and doing something with ozone to change the chemical composition of the environment. It sounds like hocus pocus, but if you’ve ever been in a house that has one of these, you recognize it because it has that fresh smell like after a rain storm. I bought a unit to use for my staging clients after I rented one for two weeks for a problem home. With two chain smokers, even a complete paint job and new pad/carpet AND having them completely remove all of their belongings didn’t improve the smell. Two weeks later…they had a completely fresh property with a sold sign in the yard!  I now rent my unit to homeowners who stage with me.   Here’s to success selling your lovely home!


Organizing to Move: How to Work with Movers September 16, 2009

Filed under: Organizing,Staging — HeartWork Organizing @ 5:20 pm
A friend of mine recently shepherded her family on their move from PA to Chicagoland (yes, that’s really what they call the area there!).  Since I moved here less than two years ago, I was just getting to know her, but I was happy to offer a few nuggets of advice about the moving process from my many, many moves over the years.

Lucky for her, she had a relocation company and professional movers handling the stuff that comprised their two kid, one dog household.  But just 5 days before the move, she sent an email to friends where she admitted she didn’t know what she should do just before the movers came, or what she should have them do first.  Having admitted that she’d already cleaned out the entire house prior to putting it on the market, using the help of a 2 ton container (read: dumpster), I knew she was in good shape for the actual move.  Here was my advice to her.
 

Let the professional movers pack everything.  That’s what they do.  If you don’t move things around for them, they’ll pack things and mark them from the room they came in, so you can remember where they came from, and not where you thought they would go.  Just make sure your stuff is in the room where it belongs, and you’ll be able to find it when you unpack.  The movers are insured, so let them take even the valuable stuff.  And you need less than you think you need while you are in transit.  You can buy almost everything you need at Target for the couple of days you’ll be separated from your stuff.  Your cars are going to hold much less than you think they will, especially with 2 kids. Except for possibly one precious photo album and the suitcases and comfort items the kids need, let the movers pack, inventory, and transport it all!


If you have a room in your home that has a split personality, make sure the movers know what you call it, so they label the box right.  They might call it “bedroom” but you call it “office”.  Or something that you call a “den” they call a “living room”.  You get the idea. You can tape a sign to the door that says, “This is the office!”, so if the movers start in on that room while you are handling something else, they’ll still label boxes correctly.
 
Remember, they will pack EVERYTHING.  They will pack your broiler pan that should stay with the oven you are selling to the new people.  They will pack trash.  They will pack dirty toilet brushes.  Yuck.  There may be 2-4 of them packing you in different rooms all at once, and you may be tied up on the phone or with last minute details on packing day, so you want things to be really clearly laid out for them. Things that should not go with you should simply not be there or should be marked and placed in one specific area that the movers know is off limits.  Writing a simple sign on a peice of paper that says, “Don’t pack anything on the Dining Room Table,”  is the simple and cheap way to handle this.  Otherwise you’ll be running from room to room yelling “yes, this, not that!”
 
Keep out for yourself a small set of tools.  Hammer, screwdiver, allen wrenches.  Most movers tell you they don’t travel with tools, and if you need to disassemble something, they’ll just stand and look at you.  I run in to this every single move.  Borrow from a neighbor if you don’t want to have to worry about packing and transporting yours.
 
If you are in to comfort items, like toilet paper and forks, pack yourself a “red cross” box.  When they arrive, ask your movers for a medium sized box, and put into it a few things that you know you’ll need the moment you arrive at your new home.  Good items to include are toilet paper; cups, plates & utensils for the first meal or two; one or two lamps and bulbs; a flashlight; extra baby, medical, or pet items you really need to locate quickly; and possibly a set of sheets for each bed. Make sure that you pack this box, then mark it on all sides with a big red X.  Instruct the movers that this is the LAST box to go on the truck, so it will be the FIRST box to come off in your new home.  This will save you a trip to the drug store, and allow you to stay home and direct the movers to place furniture and boxes in the correct spot in their new home. 
There’s lots more to moving, but these are tips that your moving company, as good as they may be, probably won’t let you in on the day before they get there.  Happy moving!