HeartWork Organizing

Helping you find peace and purpose through organization and design

Earth Day Decorating April 17, 2012

Filed under: One Day Interior Redesigns — HeartWork Organizing @ 10:45 pm
Tags: ,

Tax day.  Earth day.  It’s a big week here.  I’m also just about to reveal my new website design.  If you receive these posts via email, you should keep seeing them as scheduled, about twice a week.  If, however, you read my stuff through Facebook or some other circuitous route, you might want to check back here in exactly one week to get the new link.  The blog and website will be merged, and I’ll finally have the capability to do some fun things like giveaways.  That’s good, because I have a TON of really nice giveaways cluttering up my office right now.

I’ll also be revealing my huge office makeover in the near future.  (Note to self: probably not a good idea to redesign my site and my office in the same week.)

But today, you’ll have to settle for this little reveal.  Last weekend I was honored to accompany the Habitat for Humanity ReStore manager, Makeda Yeru, to the Delaware County EnviroFair at Strath Haven High School.  Think of a ReStore as a thrift store for household items and construction odds and ends.

I wanted to show the great stuff that ends up there, some of it donated by my clients.  (Yes, the ReStore has a truck and helpful guys who will come pick up your donated furniture and working appliances. You can call them at 484-401-1650 to arrange a pickup.)  So we picked a few things:

Redesign

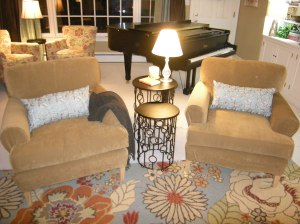
I honestly didn’t spend a lot of time on this one, folks.  But I was so happy with the outcome,

and Makeda was, too.

Doesn’t she look comfy?

I really loved the paint treatment that my assistant, Jill, did on the little table.  And I also love the little brass lamp that we turned into an indoor/outdoor lantern.  Price these in stores and you’ll pay $30-$80, but you can make them yourself!

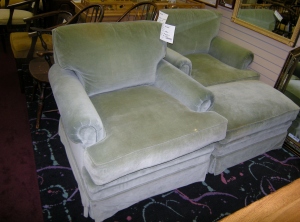
The plan was to take the slipcovered chair back to the store for display, but we almost sold it that day!  Did you notice the great slipcover from Surefit? We pulled back the foot-rest just a bit to remind you what it looked like before.

There were quite a few things to see at the fair.  I was happy to talk to the folks from The Energy Coop, where I belong and get a deal on both my heating oil and electricity.

The table next to use was doing a brisk business selling waterproof bags and even iPad cases made from juice pouches.  Get a little bling with your recycling!

There were plenty of things for the kids to do, and we got to hide the giraffe for the scavenger hunt.

My favorite part was getting to see a Nissan Leaf all electric car in person.  Actually, I ate lunch sitting right next to it and didn’t even realize it was running.  It’s not just quiet, it’s silent!   No gas.  No emissions.  No kidding.  It’s still a bit pricey, but if combustion engines were outlawed tomorrow, I’d happily run for a Leaf!

There were displays of farm co-ops and even something called the Philadelphia Cow Share, where you meat eaters can band together and each purchase 48 pounds of a cow that you help to responsibly raise as a co-op.  I would have taken a picture of my beautiful veggie wrap for lunch, but I ate it too quickly!

If there’s an environmental fair in your neck of the woods, definitely go.  You’ll get some good info, hear about products that might be hard to find otherwise, and find something that you can do to celebrate Earth Day.

(That’s it.  No more scheduled posts until next Tuesday.  Can’t wait to reveal the new site.)


How to Hang a Vintage Light Fixture April 10, 2012

Filed under: One Day Interior Redesigns — HeartWork Organizing @ 2:00 pm
Tags: ,

If you need decorating bang for your buck, start with lighting.  Although lighting is step three in a room redesign, it carries a lot of importance, and you can be thrifty with this element.  In redesign, first we place the largest pieces of furniture, then the smaller pieces of furniture, then the rugs.  Then comes the type and positioning of the lighting.  The right lighting can change the entire look of a space.  Many lighting fixtures can be had for a pretty reasonable cost, but sometimes either the budget might not allow for a desired fixture, or something with a little history is actually better for a particular space.  If you come upon the right vintage fixture, you can have it refurbished, or possibly tackle the job yourself.  Here is a guide to retrofitting a vintage hanging lamp in a foyer.

Step 1.  Find your replacement fixture. 

In this case, we found a hanging lantern that was similar to something it was replacing, but the style of our thrift store find fit the space a little better.  It had been used in another home, so it didn’t come with instructions or all the fittings we needed.   Before taking it apart, hold it up to the ceiling or gauge by the fixture that you are removing the length of the lamp cord and hanging chain that you need, if these are being replaced.

Step 1

Step 1

Step 2.  Disassemble the fixture to retrofit it.

It’s a good idea to lay the pieces out on a flat surface the way you take them off, so it will be easy to reassemble again.  Had we wanted to paint it, now would have been the time to break out the spray paint, when the glass could be taped off and the interior parts were off the main frame.  This is also the time to measure and replace critical parts like the electrical lamp cord and the hanging chain.  These are easily found at hardware and home improvement stores.

Step 2

Step 2

Step 3.  Threading

Thread the lamp cord down through the hanging chain and all the way through the stem of the fixture.  For this type, use wire strippers (inexpensive and available at hardware stores) to slit the plastic about 2″ to separate the leads and gently strip the ends of the lamp cord.  Strip both the top and the bottom ends now, and strip just about 1/4″ from both leads on either end.   Use wire nuts (you can probably use the ones that came with the original fixture) to connect the ends of the lamp cord to the electrical wires connected to the light bulbs.

Step 3

Step 3

Step 4.  Reassemble the fixture. 

Try not to have any spare parts on this step.

Step 4

Step 4

Step 5.  Hang In there.

This is where the real work begins.  Turn off the power and take down the existing light fixture.  It is best to turn off the circuit that controls this fixture at your electrical panel.  This is a fairly easy procedure.  Do pay attention to how the fixture comes down, to guide you on putting up the new one. In older houses, the old receptacle may not look like the new fixture.  This is where your helpful local hardware store or home improvement center comes in.  We have a 100-year-old home.  The box is more shallow than would be used in today’s homes, the wires are old-style, and there is no ground wire.  No matter, you can still switch out the fixture.

How to hang a light fixture

Step 5

Step 6.  Modify, if needed

To make this work, we did need a small piece called a coupler.  We got it from our favorite local hardware store when we took in the new fixture and dimensions for the electrical box in the ceiling.   It was the best $1.50 we spent, because the whole project would have been sunk without this little item.

Step 6

Step 6

By screwing the coupler on to the existing box, we got the extra bit of length that we would have otherwise had in a more modern electrical box.  If you are lucky enough to not be dealing with hundred year old electrical, you’ll skip the coupler and go right to the next step.


Step 7.  Ta-Dah!

This step is best done with two people. While one person holds the fixture, the other person connects the one wire from the fixture to one wire from the electrical box.  Tighten these again with wire nuts.  Do the same thing to the remaining two wires.  Then screw the fixture in to the coupler and adjust so the fixture collar sits flush against the ceiling.  It’s time to put the light bulbs in, turn the breaker back on, and enjoy your frugality.

Step 8

Step 8

There you go.  A couple of bucks for a garage sale or thrift store find can replace a broken fixture without breaking the bank.  No electrician required.  Just be careful on those ladders.

A version of this article was orginially published at AboutOne on 3/23/12.


How to Organize Kids Art Projects April 3, 2012

Filed under: Organizing — HeartWork Organizing @ 2:00 pm
Tags: , , , , ,

Kids’ art projects are notoriously hard to organize.  The topic comes up constantly.  There are a bazillion ways to store your little Picasso’s projects, of course, but really, simple is better.

My absolute favorite storage solution is the Li’l Davinci art frames.  You can check out this video of how these front-hinge beauties from Dynamic Frames work.  My kids (2 and 5) decide which creations are frame-worthy, and they love to help me load their new opus into the frames at least once a week.

While we have enough wall space in our house for a mini art gallery, we don’t actually have enough space in our house for the art studio it takes to create said art.  So I was thrilled to take my little ones to a new place recently, the Creative Clubhouse in Havertown, PA.  Unlike the pottery studio just down the street from our house, the Creative Clubhouse is geared for the younger set (12 months to 8 years), and I didn’t feel like I was bringing my bullish children into the china shop.  The setup is simple, with areas set up for Lego play, dough play, simple glue projects, easel art, magnet boards, a huge chalk wall (sure kids, go ahead and draw on these walls), and an area for building towers from blocks.  They also run scheduled art and music classes throughout the week.  If I had an extra room in my house for art, it would look just like the Creative Clubhouse.

Look around this space, and you’ll see some pretty simple but effective art solutions that can easily translate into most homes, even if you don’t have your own art room.  Owner, Amy, will tell you that they are all IKEA solutions, easy to pick up and easy to install.  Supplies, like paint brushes, crayons, and any other high-risk implements can be stored in cute and shiny cans hanging from organizing rails, originally meant to organize a kitchen.

how to organize kids art

Smocks and aprons, the wardrobe staple of the preschool set, hung on simple keyhook bars in the lower left corner of that shot, were super accessible to the kiddos.  At home, you might be able to hang these on the inside of a pantry door or coat closet door.

If you can’t spring for a set of Dynamic Frames, then a simple set of clips hung on airline wire, normally used to hang curtains in a hip loft space, will allow you to hang painted art, especially great for those that need a bit of drying time.

How to organize kids art supplies

For hardback or canvas creations,  this skinny ledge provides the perfect perch for a rotating display of color.  It’s only about an inch and a half deep, so it can fit into just about any space. I like the idea of adding in some favorite books to create a seasonal or theme display.

How to organize kids art supplies

Last, think multi-functional in every single piece of furniture you bring into your house once you have kids.  I think it should be a crime to manufacture any bench or ottoman without storage underneath.  With just a little planning and maybe a basket or two, a bench can store even more puzzles, games, and creative supplies.

How to organize kids art supplies

We’ve been back to the Creative Clubhouse, and I love that my kids get to be creative and messy, but I don’t have to clean it up.  If you need a few more ideas on how to store your kid’s art, check out how to organize creations in digital form, and 5 more ways to organize kids art supplies.

Are any of these solutions to organize kids’ art working in your home?


Recovering: You Might Want to Sit Down for This February 21, 2012

Filed under: One Day Interior Redesigns — HeartWork Organizing @ 2:00 pm
Tags: ,

Got kids?  Pets?  A husband?  Then your chair cushions are probably taking a beating.  One of the most satisfying decorating projects that absolutely anyone can take on is recovering a chair cushion. After snacks, stains, and general wear and tear take their toll, you can go from this:

How to recover a chair seat

Reupholstering a chair-before

to this:

Recovering chair seat cushions

Reupholstering chair seat cushions, after

in about a half an hour.  Who has more than a half hour for projects, anyway?

You only need a few tools, which you almost certainly already own, and you can freshen your chair’s look in minutes.  There is no need to be stuck with a basic boring neutral cushion.  When you see how easy it is to change, you’ll be willing to take a risk on fun and colorful fabrics, like this leopard print chenille.  (The remnant roll was $3.  Shhhh.)

Read the steps for this super easy chair makeover.

This post was originally published at AboutOne.com on 2/18/12.


Cast Offs Lead to Better Habitats February 2, 2012

Filed under: One Day Interior Redesigns — HeartWork Organizing @ 9:14 pm
Tags: , , ,

Giving new life to old treasures is a lofty calling and something I love to do.  Helping people live better lives ranks right up there with chocolate cake and spa treatments.  When I get to be involved with an organization that does both, I get shivers.

Recently, I finally made it out to visit two Habitat ReStores.  You probably have heard that Habitat for Humanity builds low-cost, safe housing for the communities they serve in the US and abroad.  In the Philadelphia area, there are several ReStores that are run by local Habitat chapters to help raise funds for their local projects by selling new and gently used donated household items.  The stores have an emphasis on building materials, but they also accept furniture, lighting, small household accessories, and many other items.  Donations are tax-deductible, and many of the items you’ll find at the stores are even new from the big box stores.

The Gloucester County ReStore is located in Pitman, South Jersey and carries way more than just doors and windows.  They have sofas, lighting fixtures, and bric-a-brac, even books.  The South Jersey chapter is finishing up their work on building an entire housing development, and they are working on several projects in the area. I worked on helping to build one of their homes years ago, before kids, of course. I fondly remember the old guys on Tuesday morning letting me help them hang kitchen cabinets when the time was right.

The Delaware County ReStore  is located inside Granite Run Mall.  When we (me and my two tiny assistants) were there recently, we spied this gorgeous vintage coffee table with a granite top.  I wanted it, but don’t currently have a project right for it.  Just look at the detail and so sweet little wheels!  Like many items at the ReStores, this beauty doesn’t even need any rehab.

For instance, I spied these wonderful wood blinds, a full set of them, that would be just right for someone needing 30″ blinds.  They are high quality and undamaged.  There were six of them.

And this light, mantel and custom cornice are also the victim of someone’s decorating project, no doubt, but a steal for the next owner.

Yes, there is plenty of cute furniture for DIYers to keep busy with.  I spied this sweet cabinet.  Can’t you just see it all modernized with a fresh coat of cream or a dramatic black?

There are plenty of deals.  There are also some basic materials.  My girls both had their dolls with them on the day we visited, and since we’re in the middle (I hope the middle and not the start) of potty training, all the dolls got to sit on the potties that were in the store.

So go, visit the ReStores.  They will be thrilled if you can save a couple of bucks on your next project, and help them raise funds for their next Habitat for Humanity house in our area.


Six Signs Your Kitchen is Outdated January 17, 2012

Filed under: One Day Interior Redesigns,Organizing — HeartWork Organizing @ 2:13 pm
Tags: ,

And so it begins.  I thought it was high time I did a kitchen series.  I’ll be sharing some of mine and others.  Here’s a few easy ideas to start out with.  Stay tuned for the next couple of weeks.  If you haven’t subscribed to the blog yet, what are you waiting for?  Look over to the side here and click subscribe, and get the goods immediately.

Even if your kitchen really is “experienced,” it doesn’t have to look old.  We don’t all have a big budget for major renovations, but these six easy and affordable fixes can ensure that your kitchen functions well and looks good, too.

1. A microwave sitting on the counter is not only a dead giveaway to the time since your last upgrade, it’s also a pretty easy fix. By moving it to where it belongs, within the line of upper cabinetry, it will expand the size of your kitchen by two and a half feet, at least on the countertop.  You probably have a hood above your range that holds a fan and light, which your new microwave will also have.  For about $200, you can get a nice microwave that has features such as the all important magic popcorn button.  For a little more, you can get the wonderful convection feature, that expands your cooking range, even browning meats and cooking breads without turning them to rubber.

2. If your fridge is over ten years old, not only will a new one provide a style update, but an energy lift as well.  According to one source, an older refrigerator might be costing you from $100/year to $280/year to operate than a newer model.  Replacing it with an energy efficient model can pay for itself in just a couple of years.

Want to see the other four? Check out the full article originally published at AboutOne.com.

Photo Credits:  ©HeartWork Organizing


Decorating Bookshelves December 27, 2011

Filed under: One Day Interior Redesigns,Organizing — HeartWork Organizing @ 2:00 pm
Tags: , ,

Your bookshelves can say a lot about you, if you know how to decorate them.  For inspiration with your bookshelves, look no farther than your favorite accessories or favorite accessory store.  That’s right, don’t limit yourself to books on your bookshelves.   Read the full article and use these bookcase decorating principles to create a bookcase you’ll love using things you probably already own.

Go from this:

Bookcases before

How to Decorate Bookcases- Before

Decorating Bookcases- After

Decorate Bookcases with Style- AFTER

Bookshelves Need Focal Points

Decorating bookshelves

Decorate Bookshelves with Room to Breathe

Play with Color

Stack and Stand

Relax

Add Lighting

Fill In Around the Edges

Whether you have a bank of built-ins, a stand-alone bookcase, or a few shelves to play with, arranging your bookcases with accessories you may already own can add miles of style to your home.  Read the full article for more on how to decorate bookcases.

Originally published in About One.

Photo Credits © HeartWork Organizing


Second Chance Decorating December 21, 2011

Filed under: Color With No Regrets,One Day Interior Redesigns — HeartWork Organizing @ 2:59 pm
Tags: , ,

Everyone deserves second chances, and that goes for good vintage furniture, too.  There’s something amazingly satisfying about repurposing something into a beautiful redesign.  Even if they aren’t old enough to be antiques, they are usually better quality that some items we find on the market today. When there is a chance to give a great piece a second life, and maybe save a few bucks, I’m all over it.

(If you find this post and the blog interesting, please click over on the side on the Subscribe button.  You’ll get fresh posts sent to your email or RSS feeds (your choice) as soon as they are hatched.)

This recent living room makeover is a great example.  If you didn’t see it, check out the wide shots of the room in the December 2011 newsletter.  Here are four of the items in the room, made over to be the perfect fit for the owner’s style.

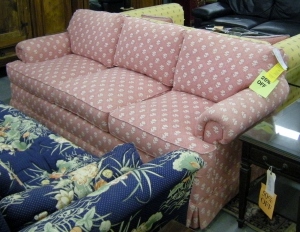
We spent 6 hours hunting for the perfect sofa.  Would you believe we found it?

Slipcovered sofa before

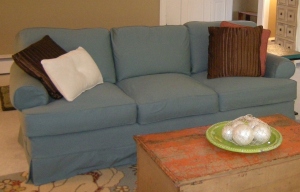
Are ya lovin’ it?  Trust me, despite the very, very pink exterior, the interior of this sofa is wonderful.   Full of feathers and the most comfortable sofa I’ve sat on in ages, the client got a steal at just $125.  Wanna see the after?

Slipcovered sofa

The beauty, of course, is that frame will likely outlast the slipcover, which can be changed in the future.  But it can also be washed, if need be.  Your regular  showroom sofa can’t pull that trick.

Then we we found a few other funky items, one of which captured my imagination.

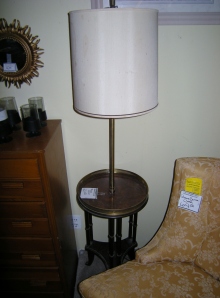
floor lamp needs a makeover

This floor lamp has bamboo-styled legs, which is a detail that I love in small doses.  But the brass trim was beaten up and the shade was a complete wreck.  Would you look twice at this beauty?

Chic black bamboo lamp

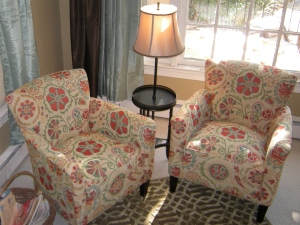
Several coats of black enamel were all it took to restore this lovely lamp.  Did I mention she was only $20 bucks to start?  And now nestled between two gorgeous, colorful and comfy chairs, she’s the perfect lamp table for the reading nook.

Here’s another transformation waiting to happen.  When I found these two club chairs and matching ottoman for only $150, I didn’t let the little bit of surface wear and ink stains throw me off.  You know there is a color change coming, right?

Club chairs waiting for slipcovers

With my favorite instant makeover tool, high quality stretch slipcovers, and a bit of work in the background, these “new” chairs fit right in.

club chairs with slipcovers

The last of the second chances I’ll show you here is a bright pop of color.  With just a teensy bit of repair, we repurposed this old chest into the room’s coffee table.  If I told you I was bringing a beat up old orange trunk into this room with a grand piano, would it make sense?  But this one, which once might have been a foot locker or fishing tackle storage for all I know, looks right at home in this warm place for one of my favorite families to gather.

I hope you enjoyed seeing these items we used in this second chance decorating project.  Are there vintage items in your home or at your local thrift shop that can be fabulous with just the right touch?


How to Decorate an Office for the Holidays December 15, 2011

Filed under: Business Organizing,One Day Interior Redesigns — HeartWork Organizing @ 1:22 pm
Tags: ,
Decorating an office for the holidays

If you want to stick with traditional, use on hand materials to customize office decorations.

Decorating an office for the holidays can put co-workers, employees and customers in festive spirits without feeling commercialized.  You can use these same tricks to make your home decorating beautiful and personal.  I like to keep it as green as possible, as affordable as possible, customized, and classic.  Click here for the full article on how to decorate your office this year, or use these same easy principles to decorate for any holiday.

Decorating for Holidays beyond red and green

You can step outside traditional red and green to create custom decorating themes for an office.

Whatever you do to decorate your office, enjoy this opportunity to share a bit of your own style for the holidays.

This post originally published in About One.


Lighting Matters When Decorating November 29, 2011

Filed under: Color With No Regrets,One Day Interior Redesigns — HeartWork Organizing @ 2:00 pm
Tags: ,

A friend and I are picking items for her new kitchen, and we were reminded again today to use the one criteria most taken for granted-lighting, anywhere and everywhere.

Outside lighting on a kitchen backsplash

My friend, I’ll call her Celia, did a great job of picking seven different floor samples to take home to try out. On her way out of the store, she spotted the perfect, to die for, colorful tumbled stone backsplash (see photo above). I cautioned Celia that she was seeing her picks in a huge warehouse store with terrible fluorescent lighting, and they were picking up colors of samples around them, not the colors they will be picking up in her kitchen.

The minute we walked out of the store, we saw all of the samples turn shades. Eew. Some of the items went pink, some went orange, some of them lost their color altogether.

A few hours later, I got an interesting email from Celia. Her colorful stone backsplash went drab at home. The darkest floor tile sample that was sure to be rejected in her light-starved kitchen turned out to be her most favorite and most colorful.

Was this shopping trip a failure? Not at all. We have options to improve the lighting that will restore the shine and color to the backsplash, and we both agree that it still reflects her style. And by spending that time in the warehouse store looking at all available samples, Celia has also zeroed in on qualities for the floor tile that previously knocked out several contenders.

So next time you are shopping for decorating choices, watch out for big spaces, bad lighting, and snappy judgements. Take samples home and see what they say to you in the lighting where they will live. Let me know how it goes.


How to Decorate Mudrooms November 8, 2011

Filed under: One Day Interior Redesigns,Organizing — HeartWork Organizing @ 11:50 pm
Tags: , ,

The mudroom or entry way to your home is probably the hardest working space in the house.  Decorating a mudroom can be a challenge because the space is usually small, multi-tasking, and heavily used.  If you have kids or dogs, an entry hall or mudroom can be a disaster waiting to happen.  It helps to know how to pick paint for high traffic areas and a few other tricks when decorating a mudroom.

how to pick paint; choosing paint; decorating a mudroom; mudrooms

Read more about how to choose the best paint, furniture, lighting and accents for your mudroom at the originally published location for How to Decorate Mudrooms.


Photo credit and © HeartWork Organizing 2011.

Originally published in www.blog.AboutOne.com.


The Science of Halloween Colors: Orange, Purple, Green October 29, 2011

Filed under: Color With No Regrets — HeartWork Organizing @ 11:45 pm
Tags: , ,
Would You Decorate with Purple, Green and Orange Year Round?
Quick, what colors do you think of for Halloween? Start with orange
for pumpkins, of course, fall leaves, and candy corn.    Then purple.  Add
green.  We see it all the time.  This little assortments was in my daughter’s
goodie bag from school this week.
Halloween Color Triad
OK, so orange, violet and green are traditional Halloween colors, but
there’s more to it than that.  It turns out there is a scientific reason that we
put these colors together.  They are a color triad.  In other words, they are
found equidistant from each other on the color wheel, which is usually shown as
having twelve positions, or slices of the pie.
We usually see the “loud” version of this for Halloween decorations,
with very saturated color choices, as in the picture above.
But consider these things…
When these colors (or any other triad, for that matter) are used in
different proportion throughout your house in different rooms, your house will
read as a colorful and thoughtfully decorated home.  You can see this at work in
a home I had the honor of redesigning a few years ago.
Orange living room
Violet bedroom
Green office

You may have seen these photos before, because I was so happy with the collaboration
between the client and I, but now that you see the photos together, you can see
that the color choices are a natural triad.

If these colors are too bold for you, check these out.  They are all variations on
the orange/green/purple theme, believe it or not!

color choices based on Halloween triad

Did you notice that the two sets of colors on the right are the exact same colors,
but shown in different proportions?  If so, give yourself a star.

We could go on and on about the fun you can have with tint and tone, proportions,
accent colors and the fact that even neutrals have colors, as in the lower left
samples above.

I hope all of this gives you a new eye for color.  If not, you know where to find me.

Ya know, the holidays are coming.  If there is any tweaking you’d like to do your
home or office, please call me soon!

color combos above, all from Sherwin Williams and
available in Duration Home paint:

Top left:

6624 Peach Blossom/6709 Gleeful/9822 Wisteria

Bottom left:

6064 Reticence/ 6150 Universal Khaki/ 6260 Unique Gray

Right samples:

7707 Copper Wire/7742 Agate Green/ 7579 Alaea


How to Have an Art Room of One’s Own October 18, 2011

Filed under: One Day Interior Redesigns — HeartWork Organizing @ 9:20 pm
Tags: , , ,

Doing design work for artists is some of the most intimidating and rewarding work that I do.  Many people think that if they are good at some things, they should be good at all things.  Not so.  My recent collaboration with a collage artist shows this in action.  She is absolutely fabulous with her collage and mixed media art, but her spaces were not showing her personal style.  While I can make her room sing, I couldn’t collage like she can to save my life.  I often found myself gazing at her creations, which is kind of unusual for me since I’m surrounded by so many gorgeous influences all day long.  But she needed a little help to turn her unused bedroom into a space that she ended up calling something special.  Read to the end to hear what she thought of her transformed space.

Before:

After:

Closet Storage before:

Closet storage after; even this can be a gallery space.

Window treatments needed to say something more interesting than the before:

So the window got a fresh new simple treatment:

Of course the office side needed a facelift, too:

And the whole space became more organized and calm:

Can’t decide if my favorite part is the pretty organization…

the stylish cork memo board circles…

Or the Dynamic Frames gallery

She can update these just by flipping open the fronts and presto-chango updating her portfolio…

Perfect for displaying the client’s own works and her favorite things.

Her final judgement:  the space is cheerful, fresh and original.  Just the sort of space to inspire more beautiful creations.


How to Get the WOW Factor in Just One Day July 30, 2011

Filed under: One Day Interior Redesigns — HeartWork Organizing @ 8:03 pm
Tags: , , ,

Color.  Need I say more?  Just a little.  Just the right values.  Just the ones that will highlight the stuff you already own.  Improve the lighting.  And a little shimmer never hurts.  See for yourself.

Before


After

Same furniture.  Same rug.  A whole new attitude.  If the entry into your home isn’t saying wow, please call me. We can help.


Covering Perplexing Patio Doors with Pretty Treatments May 12, 2011

Filed under: One Day Interior Redesigns — HeartWork Organizing @ 11:33 pm
Tags: , ,

Patio doors are some of the trickiest windows to cover.  For years, the standard solution was to slap up those awful plastic vertical blinds.  You basically had two choices, whether to go with the plain or the fabric-covered spines.  Well, I see more than my fair share of vertical blinds that have been up for 5, 10, 15 or more years, and they are revolting.  I mean, they are throwing in the towel and coming down, one by one.  They are giving up the ghost, one piece at a time.   The experts at the Blind Gallery in Wayne, PA have not one or two, but FIVE excellent suggestions when it is time to replace those blinds. 

1.  If you must stick with vertical blinds, soften them up with an integrated fabric treatment.  These have an integrated color sheer, and look very classy.

2.  Using the same idea as an accordion, these blinds stack to the side with a tiny footprint, which allows you to control the light when needed, but enjoy as much of the view, or just keep a very clean line to the treatment.

3.  The Illusion blinds are usually seen horizontally, but they are offered as verticals, too.  What makes them different from the older vertical blinds is that the “spine” is a soft fabric treatment that is integrated with the sheer.  They can be completely closed, open so the spines are vertical and the view is maintained with some privacy, or completely pulled out of the way for an unobstructed view.   They come in several colors.  These are definitely considered an upgrade by most realtors.  I own a few of these, and they do provide a lot of functionality with a soft touch.


4.  Woven woods are hot, hot, hot, and they now come in vertical options as well.  I’ve seen all the different options, from minimal to reedy to extreme color to funky, and there is something for everyone within the woven wood selections at the Blind Gallery.  This photo shows woven woods and fabric panels in a den that I completed a while back.  I just love how the light filters through very softly, but you can get these backed for more darkning, if you prefer.

5.  Some might think I’ve saved the best for last.  Plantation shutters are the creme de la creme in window treatments, but did you know they can be fitted for patio doors?  They are mounted on a molding frame that is custom to the size of the door.  The panels can have operating lovers, just like regular shutters, and the panels that correspond to the patio door panels slide to give you access.  These are really very attractive, and provide an upscale and clean look.  One client loves hers because it helps define her florida vacation decor, right here in PA.

I hope you enjoyed window shopping with these styles.  If you get a chance to visit with Luke (below) or Tony at the Blind Gallery, tell ’em Darla  sent you.  Find them at www.BlindGalleryPA.com.


10 No Brainer Ways to Freshen Up Decor for Spring April 12, 2011

Filed under: One Day Interior Redesigns — HeartWork Organizing @ 11:03 pm
Tags: ,

Not time or budget to decorate?  Here are ten easy ways to make a difference in your decor with little or no effort.  Pick just three and you’ll brighten your space instantly:


  1. Freshen up pots.  It’s early, but hardy pansies, daffodils and tulips are ready to go in the ground or pots.
  2. Change your flag.  Splurge on a new decorative flag for the lawn. 
  3. Add door decor.  A banner, wreath, or huge paper butterfly can have impact from the street.  No butterlies in residence?  You can make your own from bright wrapping paper.
  4. Switch out wreaths.  Indoor wreaths get dusty and fade.  If yours has been up more than three years, time for a new one.
  5. Lighten window treatments.  Remove heavy curtains or pull them back from the window frames for the time being to allow more light and give you a chance to highlight furnishings.
  6. Buy new throw pillows.  A $10 bejewelled throw pillow can always brighten my mood.
  7. Put clutter in baskets.  If you are tired of piles, assign them a home, and assign the baskets a shelf or nook.  You’ll feel instantly more organized.
  8. Clear kitchen counters.  Declare a no-drop zone, and decorate it with pretty pottery you already have on hand to discourage clutter.
  9. Change rugs.  Shake and wash smaller rugs.  Replace worn rugs with high-impact colors and patterns in a new throw rung.  Small commitment but big impact.
  10. Table it.  Create a tablescape from items you already have.  For instance, place a small bowl of lemons or oranges on a footed cake plate ringed with polkadot or yellow ribbon.  Makes you smile just thinking about it.