HeartWork Organizing

Helping you find peace and purpose through organization and design

Earth Day Decorating April 17, 2012

Filed under: One Day Interior Redesigns — HeartWork Organizing @ 10:45 pm
Tags: ,

Tax day.  Earth day.  It’s a big week here.  I’m also just about to reveal my new website design.  If you receive these posts via email, you should keep seeing them as scheduled, about twice a week.  If, however, you read my stuff through Facebook or some other circuitous route, you might want to check back here in exactly one week to get the new link.  The blog and website will be merged, and I’ll finally have the capability to do some fun things like giveaways.  That’s good, because I have a TON of really nice giveaways cluttering up my office right now.

I’ll also be revealing my huge office makeover in the near future.  (Note to self: probably not a good idea to redesign my site and my office in the same week.)

But today, you’ll have to settle for this little reveal.  Last weekend I was honored to accompany the Habitat for Humanity ReStore manager, Makeda Yeru, to the Delaware County EnviroFair at Strath Haven High School.  Think of a ReStore as a thrift store for household items and construction odds and ends.

I wanted to show the great stuff that ends up there, some of it donated by my clients.  (Yes, the ReStore has a truck and helpful guys who will come pick up your donated furniture and working appliances. You can call them at 484-401-1650 to arrange a pickup.)  So we picked a few things:

Redesign

I honestly didn’t spend a lot of time on this one, folks.  But I was so happy with the outcome,

and Makeda was, too.

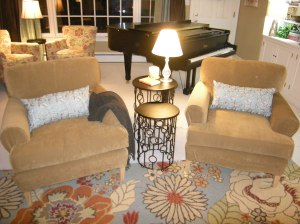
Doesn’t she look comfy?

I really loved the paint treatment that my assistant, Jill, did on the little table.  And I also love the little brass lamp that we turned into an indoor/outdoor lantern.  Price these in stores and you’ll pay $30-$80, but you can make them yourself!

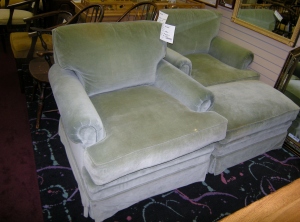
The plan was to take the slipcovered chair back to the store for display, but we almost sold it that day!  Did you notice the great slipcover from Surefit? We pulled back the foot-rest just a bit to remind you what it looked like before.

There were quite a few things to see at the fair.  I was happy to talk to the folks from The Energy Coop, where I belong and get a deal on both my heating oil and electricity.

The table next to use was doing a brisk business selling waterproof bags and even iPad cases made from juice pouches.  Get a little bling with your recycling!

There were plenty of things for the kids to do, and we got to hide the giraffe for the scavenger hunt.

My favorite part was getting to see a Nissan Leaf all electric car in person.  Actually, I ate lunch sitting right next to it and didn’t even realize it was running.  It’s not just quiet, it’s silent!   No gas.  No emissions.  No kidding.  It’s still a bit pricey, but if combustion engines were outlawed tomorrow, I’d happily run for a Leaf!

There were displays of farm co-ops and even something called the Philadelphia Cow Share, where you meat eaters can band together and each purchase 48 pounds of a cow that you help to responsibly raise as a co-op.  I would have taken a picture of my beautiful veggie wrap for lunch, but I ate it too quickly!

If there’s an environmental fair in your neck of the woods, definitely go.  You’ll get some good info, hear about products that might be hard to find otherwise, and find something that you can do to celebrate Earth Day.

(That’s it.  No more scheduled posts until next Tuesday.  Can’t wait to reveal the new site.)


How to Hang a Vintage Light Fixture April 10, 2012

Filed under: One Day Interior Redesigns — HeartWork Organizing @ 2:00 pm
Tags: ,

If you need decorating bang for your buck, start with lighting.  Although lighting is step three in a room redesign, it carries a lot of importance, and you can be thrifty with this element.  In redesign, first we place the largest pieces of furniture, then the smaller pieces of furniture, then the rugs.  Then comes the type and positioning of the lighting.  The right lighting can change the entire look of a space.  Many lighting fixtures can be had for a pretty reasonable cost, but sometimes either the budget might not allow for a desired fixture, or something with a little history is actually better for a particular space.  If you come upon the right vintage fixture, you can have it refurbished, or possibly tackle the job yourself.  Here is a guide to retrofitting a vintage hanging lamp in a foyer.

Step 1.  Find your replacement fixture. 

In this case, we found a hanging lantern that was similar to something it was replacing, but the style of our thrift store find fit the space a little better.  It had been used in another home, so it didn’t come with instructions or all the fittings we needed.   Before taking it apart, hold it up to the ceiling or gauge by the fixture that you are removing the length of the lamp cord and hanging chain that you need, if these are being replaced.

Step 1

Step 1

Step 2.  Disassemble the fixture to retrofit it.

It’s a good idea to lay the pieces out on a flat surface the way you take them off, so it will be easy to reassemble again.  Had we wanted to paint it, now would have been the time to break out the spray paint, when the glass could be taped off and the interior parts were off the main frame.  This is also the time to measure and replace critical parts like the electrical lamp cord and the hanging chain.  These are easily found at hardware and home improvement stores.

Step 2

Step 2

Step 3.  Threading

Thread the lamp cord down through the hanging chain and all the way through the stem of the fixture.  For this type, use wire strippers (inexpensive and available at hardware stores) to slit the plastic about 2″ to separate the leads and gently strip the ends of the lamp cord.  Strip both the top and the bottom ends now, and strip just about 1/4″ from both leads on either end.   Use wire nuts (you can probably use the ones that came with the original fixture) to connect the ends of the lamp cord to the electrical wires connected to the light bulbs.

Step 3

Step 3

Step 4.  Reassemble the fixture. 

Try not to have any spare parts on this step.

Step 4

Step 4

Step 5.  Hang In there.

This is where the real work begins.  Turn off the power and take down the existing light fixture.  It is best to turn off the circuit that controls this fixture at your electrical panel.  This is a fairly easy procedure.  Do pay attention to how the fixture comes down, to guide you on putting up the new one. In older houses, the old receptacle may not look like the new fixture.  This is where your helpful local hardware store or home improvement center comes in.  We have a 100-year-old home.  The box is more shallow than would be used in today’s homes, the wires are old-style, and there is no ground wire.  No matter, you can still switch out the fixture.

How to hang a light fixture

Step 5

Step 6.  Modify, if needed

To make this work, we did need a small piece called a coupler.  We got it from our favorite local hardware store when we took in the new fixture and dimensions for the electrical box in the ceiling.   It was the best $1.50 we spent, because the whole project would have been sunk without this little item.

Step 6

Step 6

By screwing the coupler on to the existing box, we got the extra bit of length that we would have otherwise had in a more modern electrical box.  If you are lucky enough to not be dealing with hundred year old electrical, you’ll skip the coupler and go right to the next step.


Step 7.  Ta-Dah!

This step is best done with two people. While one person holds the fixture, the other person connects the one wire from the fixture to one wire from the electrical box.  Tighten these again with wire nuts.  Do the same thing to the remaining two wires.  Then screw the fixture in to the coupler and adjust so the fixture collar sits flush against the ceiling.  It’s time to put the light bulbs in, turn the breaker back on, and enjoy your frugality.

Step 8

Step 8

There you go.  A couple of bucks for a garage sale or thrift store find can replace a broken fixture without breaking the bank.  No electrician required.  Just be careful on those ladders.

A version of this article was orginially published at AboutOne on 3/23/12.


Home Office In a Closet March 28, 2012

I was talking to a friend about this particular transformation, and realized it had never made it to the blog, so here you go.  For those of you who work at home, you can have a super-functional and pretty office, in just about 30″ of space (deep).

Before:

how to have a home office in a closet

After:

How to have a home office in a closet

What would you accomplish if your office was this pretty?


Wreaths Go ‘Round February 28, 2012

Filed under: One Day Interior Redesigns — HeartWork Organizing @ 2:00 pm

The months between Christmas and spring are a tough time to decorate. Repurposing something on hand, like an old wreath, can be just the right creative outlet for this time of year, adding a splash of color to your home. Let’s start at the front door.

Faded and worn wreaths seem to hang around, in bags and basement store rooms, way longer than they should.  Florals take a beating from the sun, elements, and time, but the ring that the original wreath is built on might still have another life, like this project shown here.

In about an hour, go from this:

how to make wreaths- before
Before (Hint: those pointy things used to be green)

to this:

how to make wreaths after
After

Make A Wreath – Demolition

First, strip the old wreath down to its bones. I love demo way too much. I really love demo, even on this small scale. I can see the better option even before the old version is out of the way. Just pull off the old florals, making a righteous mess as you go.

how to make wreaths -demolition
Demolition

Next, take some time to meticulously select and trim exotic materials that you grew in your shiny glass backyard greenhouse.  Or, do what I did, and pick up a bundle of scented florals at your local home decorating store, like HomeGoods. Most people would buy this bundle and stick it in a vase, but we can do better.

how to make wreaths - materials

Separate the floral bundle into its elements, because we are going to work in layers.

how to make wreaths - materials
Sorted

Make A Wreath – Tools

Go get your glue gun. Getting excited? For some people, it’s the most important appliance in their house. Mine only comes out for projects like this, after the kids go to bed. Go warm that baby up.

Starting with a background layer, glue several strands of grass or other filler to the wreath. Work the material into the vines to create stability for the next layers. Use the most basic and plentiful materials first, then the more colorful materials. Keep moving the wreath in a circular patterns so you see it from all angles and fill in evenly.

how to make wreaths - base layer
Base layer

Finally, use all the embellishments in the bunch. Even simple elements like the chunky ends of bamboo make a statement.  There is very little to no waste in good floral arranging.

You probably won’t even have to make a hook for the back, since you are using a recycled wreath.

Make a Wreath – Inspiration

The first take of this wreath was declared “a little wild” by my honey.

how to make wreaths - wild

On the wild side

Imitating a completely wild wreath that I saw in a client’s home wasn’t working for me, mostly because their home is about twice the size of mine.

how to make wreaths - inspiration
My inspiration

I removed the bottom layer of grass, trimmed them to a shorter length, and re-glued them. Now it actually fits on the front door.

The bundle of grass cost less than $10. The wreath form was free/repurposed. The whole project took about an hour. Comparable wreaths sell for between $25 and $50. This little baby will jazz up the front door very nicely until we’re ready to welcome spring decor.

how to make wreaths - finished

Finished wreath


Recovering: You Might Want to Sit Down for This February 21, 2012

Filed under: One Day Interior Redesigns — HeartWork Organizing @ 2:00 pm
Tags: ,

Got kids?  Pets?  A husband?  Then your chair cushions are probably taking a beating.  One of the most satisfying decorating projects that absolutely anyone can take on is recovering a chair cushion. After snacks, stains, and general wear and tear take their toll, you can go from this:

How to recover a chair seat

Reupholstering a chair-before

to this:

Recovering chair seat cushions

Reupholstering chair seat cushions, after

in about a half an hour.  Who has more than a half hour for projects, anyway?

You only need a few tools, which you almost certainly already own, and you can freshen your chair’s look in minutes.  There is no need to be stuck with a basic boring neutral cushion.  When you see how easy it is to change, you’ll be willing to take a risk on fun and colorful fabrics, like this leopard print chenille.  (The remnant roll was $3.  Shhhh.)

Read the steps for this super easy chair makeover.

This post was originally published at AboutOne.com on 2/18/12.


Cast Offs Lead to Better Habitats February 2, 2012

Filed under: One Day Interior Redesigns — HeartWork Organizing @ 9:14 pm
Tags: , , ,

Giving new life to old treasures is a lofty calling and something I love to do.  Helping people live better lives ranks right up there with chocolate cake and spa treatments.  When I get to be involved with an organization that does both, I get shivers.

Recently, I finally made it out to visit two Habitat ReStores.  You probably have heard that Habitat for Humanity builds low-cost, safe housing for the communities they serve in the US and abroad.  In the Philadelphia area, there are several ReStores that are run by local Habitat chapters to help raise funds for their local projects by selling new and gently used donated household items.  The stores have an emphasis on building materials, but they also accept furniture, lighting, small household accessories, and many other items.  Donations are tax-deductible, and many of the items you’ll find at the stores are even new from the big box stores.

The Gloucester County ReStore is located in Pitman, South Jersey and carries way more than just doors and windows.  They have sofas, lighting fixtures, and bric-a-brac, even books.  The South Jersey chapter is finishing up their work on building an entire housing development, and they are working on several projects in the area. I worked on helping to build one of their homes years ago, before kids, of course. I fondly remember the old guys on Tuesday morning letting me help them hang kitchen cabinets when the time was right.

The Delaware County ReStore  is located inside Granite Run Mall.  When we (me and my two tiny assistants) were there recently, we spied this gorgeous vintage coffee table with a granite top.  I wanted it, but don’t currently have a project right for it.  Just look at the detail and so sweet little wheels!  Like many items at the ReStores, this beauty doesn’t even need any rehab.

For instance, I spied these wonderful wood blinds, a full set of them, that would be just right for someone needing 30″ blinds.  They are high quality and undamaged.  There were six of them.

And this light, mantel and custom cornice are also the victim of someone’s decorating project, no doubt, but a steal for the next owner.

Yes, there is plenty of cute furniture for DIYers to keep busy with.  I spied this sweet cabinet.  Can’t you just see it all modernized with a fresh coat of cream or a dramatic black?

There are plenty of deals.  There are also some basic materials.  My girls both had their dolls with them on the day we visited, and since we’re in the middle (I hope the middle and not the start) of potty training, all the dolls got to sit on the potties that were in the store.

So go, visit the ReStores.  They will be thrilled if you can save a couple of bucks on your next project, and help them raise funds for their next Habitat for Humanity house in our area.


Radiators Spell Decorating Trouble January 31, 2012

Filed under: One Day Interior Redesigns — HeartWork Organizing @ 3:33 pm
Tags:

We just spent a few days at The Sweetest Place on Earth over the holidays, and I was reminded once again about a trouble spot that many people have in their homes…their radiators.  The folks  at Hershey have great taste, even when it comes to decorating.  When it comes to radiators and curtains, I saw a great solution to a common decorating problem at the Hotel Hershey, of Hershey, PA.

Keep it Classy

Window treatments and obtrusive radiators, often found in older homes, are often at odds with each other.  Large cast iron radiators and their covers pose space constraints, and baseboard heaters with a slimmer profile can sometimes cause safety concerns.  Consider both when choosing window treatments.

radiators and classy window treatments at Hotel Hershey

Image courtesy of Hotel Hershey

This photo above, courtesy of the Hotel Hershey, shows a very classy treatment that can work in any home.  Stylish floor-length panels flank the heater unit, giving drama and presence to the window, while an inside treatment that provides for light control is cut to just above the unit and can be adjusted without impediment.  The complementary top treatment finishes it off.

Baseboard Heaters

For lower profile baseboard heaters, this photo demonstrates how a standard 84” panel pair can be swept up with a tie back to a safe height.  Local dry cleaners and local tailors can also hem them, which is what we did to the sheers in this photo.

How to Decorate Around Radiators

How to Decorate Around Radiators

Safety

In general, a water-fed heating system will not heat to dangerous temperatures, so window treatments can be placed adjacent to the fixture.  Baseboard heaters can be water-fed (see above) or electrical, which can heat to higher temperatures and have a heating element inside.  Leave a clearance of at least 6” from the baseboard heaters for all window treatments and soft coverings.  And of course, always keep soft treatments away from portable oil and electric heaters, according to the manufacturer’s suggestions, and that includes decorative and functional fireplaces.  I like to keep a clearance of at least three feet or more.

How have you decorated your windows surrounded by radiators?

Originally published in AboutOne.


Mini-Kitchen Makeover With Pink Appeal January 26, 2012

Filed under: Color With No Regrets,One Day Interior Redesigns — HeartWork Organizing @ 2:00 pm
Tags: , , ,

More in the kitchen series: Yes, technically a this is also a kitchen, but for very small cooks.  And very pink.

Have you ever seen two little girls play in the Pottery Barn Kids store in the kitchen section?  Let me tell you, I thought I would not be able to get my girls out of there recently.  But for $700, there better be a real stainless refrigerator in that set, right??

Pottery Barn Kids Retro Kitchen

Kitchen Remodel for a Screaming Ugly Kitchen

When I had the chance to pick up a really sturdy wood construction three-piece kitchen for just $10 at a recent consignment sale, I couldn’t pass it up.  But, boy, was it ugly.  Purple, deep pink, and a shade of blue that made my eyes hurt.

Still, I could tell this was worth remodeling.  The girls got to play with them for a couple of weeks, then down to my workshop they went.  There were some details I liked, including the foil burners on the stove…

And some details I didn’t like, as in the unfinished backs and interiors.

Even though it’s miniature, this kitchen paint job starts like any other.  With a simple step, you can avoid this mistake: properly prepare oil paint surfaces.  Use this tip to tell if you have latex or oil paint on your existing surface.

Color Choices for a Super Cute Kitchen Remodel

Then primed, lightly sanded between coats, and rolled on two coats of Sherwin Williams Impatiens Petal SW 6582.  Picking this shade might have been the hardest part of the project, but luckily, I am an expert at picking Color with No Regrets.

It always amazes me how bad the primer coat looks. I’m showing you this just in case you want to paint your real cabinets.  Remember to use a good quality roller and sand in between coats to remove any fuzzies that are left behind by the roller.

I decided not to mess with the attached kitchen faucet on my set, and I saved a few bucks by spray painting the handles a stainless steel finish. There were two different sets of hardware here, but it didn’t make sense to spring for the $20 bucks for new hardware.  Remember, the whole set only cost $10 to start.

Kitchen Remodel: The Big Reveal

I was able to finish and bring the kitchen back upstairs a week before Christmas.  The girls love it.  Last week I thought one of the clients who visits my home office was going to rush over and get caught up in kitchen play when she saw it. I originally wasn’t going to keep all three pieces, but once they were done, the girls loved it so much that the whole set ended up in our living room instead of the play room.  How could we not keep them all?

Santa (aka Nonni) did come through with the actual Pottery Barn tea kettle that makes boiling and pouring noises.  At $40, it cost more than the kitchen and all the remodel supplies together, but it is the splurge that makes our little play kitchen irresistible.

I especially love that the backs and insides of all the pieces are finished now.  Thank you, IKEA, for such cute play fruit. And I love that the kitchen is actually storage as well.  The dishes and food are always stored inside the three pieces.

All in all, for the few hours of work it took to bring this retro kitchen up to speed, I can say that it was SO worth it!  This is a kitchen set that I am happy to have in my home for the next few years.  And I’ve even happier to have “saved” $680 versus the other kitchen.  The girls seem to love it, too.

And yes, in case you are wondering, the painting process I followed here or a cabinet paint product would work just as well for your real wood cabinets, in pink or any other color.


Kitchen Remodel: What Would You Do? January 24, 2012

Filed under: One Day Interior Redesigns — HeartWork Organizing @ 2:00 pm
Tags: , ,

Thanks for hanging with me on my kitchen series.  And now a shameless plug.  If you haven’t already registered for the now famous Dump and Run Kitchen Strategies Organizing Class on February 11, please do so right now.  It’s coming up quick.  This is the yummiest organizing class you’ll ever attend.  And SOOOO practical.  I’ll show you how to keep your family fed with cheap, healthy, tasty meals that I spend about 10 minutes a day preparing in my crock-pot.  You get to come, make your own crock-pot meal, and take it home to eat that night.  We oversold last year, but I won’t do that again this year, because there are only so many chairs in my house.  Hear what one person had to say last year and sign up now.  This weekend I made sausage and peppers in about 5 minutes, and it fed us for two days. 

If you come to the class, you’ll also get to peek in my pantry, get organizing ideas for your own drawers, and see my kitchen…Ah yes, we’re back to the kitchen blog series.

What would you do if this were your kitchen remodel?

I’ve been grappling with my kitchen for some time now.  It’s a nice kitchen, but not great.  My hundred year old home was not built with today’s family or designs in mind. Here is the current footprint before the remodel.

Kitchen renovation- current footprint
I know this kitchen has been remodeled once, because we actually have the very cool original blueprints framed and hanging in our living room and the paperwork on the cabinet refacing that was done 15 years ago.
Kitchen renovation before

Galley Style

Here’s my problem.  My husband and I are super frugal people.  We weren’t always this way, but by making very frugal choices over the years, we’ve been able to enjoy some really great things, like peace of mind, and career changes without fear. So now, when we’ve been blessed to move to a great house in a fabulous location, we’ve decided to make some changes to our dated kitchen.  It’s not a horrible, completely ugly kitchen.  It’s just a little dated.  It has its problems.
  • We butchered the laminate counter when we replaced the stove a few years ago.
  • The eat in area is just big enough for our table, but not big enough for more than two people.
  • The walk-in pantry is just steps outside the kitchen, in the dining room.
  • There is a ton of wasted space above the laundry, which is in the kitchen behind the fridge, in this picture.
  • The galley style is not my favorite layout.
  • The laminate cabinets are a bit dated, but not completely ugly, and could be improved, perhaps, by Cabinet Transformations.
  • Our “mudroom” is 6 coat hooks and a shoe-bench at the end of our counter.
  • Crumbling walls behind the cabinets and a direct vent to the outside behind the microwave create a constant draft.
  • But the biggest problem is the wall that separates the back staircase from the kitchen.  I can envision this wall GONE< GONE< GONE, and visually expanding the kitchen by about 8 feet.
kitchen renovation before
But there is a lot of good about our kitchen, too:
The durable vinyl flooring was installed immediately before we bought the house four years ago, and wears great.
The layout is adequate, and all the cabinets are sturdy.
There is plenty of cabinet and counter space.
The taxes on our old home appear to be very low compared to newer construction in the area. A remodel would jack up the taxes. Yuck.
The Choice for Our Kitchen Remodel
So I am currently faced with some options.  A minor kitchen remodel would include the following:
New Cambria engineered stone counters.  Maybe I’ll do a post later on why granite is not the best choice for a kitchen remodel.
Stylish new backsplash
Side panel on the dishwasher, providing support for the new counter and separation from the stove
Patch behind the microwave, closing up the vent flap, and stuff insulation behind the cabinets before the new counter top goes on
New sink, disposal, and faucet
New electrical outlets and new under cabinet LED lighting.
This option would take about a week to complete, but I’d only be out of service for the day they install the new counter.

The major kitchen remodel would be a total gut.  Here’s one version of the new floor plan.  See the big mass in the middle?  That is a big honking 12′ island with no wall in the middle, that allows me to keep my laundry in the kitchen and even add cabinetry.

Kitchen renovation plan 4

  • The major change would be removal of the wall behind the washer/dryer, opening up the kitchen for a humongous island.
  • We’ll either need to live with a bar height island or purchase a smaller washer/dryer to accommodate a standard height island.
  • We will need to relocate the current powder room to the current pantry, which will allow us to have a more traditional commode AND sink.  (Woohoo!  A sink in the bathroom?  Apparently an option one hundred years ago.)
  • We will have to get all new flooring, which means we may as well remove the 3 cast iron radiators and install radiant heat flooring, which means we have more room for cabinets.
  • We will gain visual access to the two windows, now currently in the powder room and rear hallway.
  • We will gain insulation!!!!!
  • We would definitely gain the WOW factor.
We would be out of service completely for 6-8 weeks.  With toddlers.  Who eat 6 times a day.  And access to our basement is through the kitchen, which means we’ll be limited to accessing that space (where I store many of my work supplies) sparingly.
Did I mention we’ll be down a kitchen for 6-8 weeks?  With toddlers.
But, we’d end up with a dream kitchen.  Here’s my inspiration.  This kitchen is on the website of one of my favorite builders, http://ciprianiremodelingsolutions.com .
Kitchen renovation inspiration

Dreamy.

What would you do?  Obviously, there is also a major price difference, but the frugal choices we’ve made up to now mean we’re not especially pressured financially.  I just have to find somewhere else to hang out for 6-8 weeks besides the kitchen.  With two tiny eating machines in the house. OK, I’ll admit, I eat constantly, too.
Do I just shelve the whole idea of a kitchen remodel for 4 more years until they are in school and out of the house much of the day?  Has anyone else lived through this?  Want to talk me into a position?  Come to the Dump and Run class on February 11, make your case, and leave with your dinner.
Do nothing for 4 years, then dream kitchen?
Minor kitchen remodel now and dream kitchen later?
Major kitchen remodel now?
Move?  (Do not give my hubby one more reason to hang out on Realtor.com!)
What would you do?  I’d love to hear.
 

Kitchen Remodel vs. Facelift January 19, 2012

Filed under: One Day Interior Redesigns,Staging — HeartWork Organizing @ 2:12 pm

Did you know that Remodeling Magazine produces a helpful Cost Vs Value report every year helping homeowners to determine the relative value of their home remodeling projects?  One interesting fact is that a “Minor Kitchen Remodel” has typically recouped greater (72%) return on investment (ROI) over a “Major Kitchen Remodel” at 66%.  Those numbers have been consistent for at least the years I’ve been watching them.  So when another mom friend with two children about the same ages as mine was asking my advice on updating her kitchen, I asked her to seriously consider what the advantages to complete gut would be over a cosmetic remodel.

In the end, she decided to go with a minor remodel, updating the oak cabinets and oddly added crown molding with an antique cream finish.  She used the Rustoleum Cabinet Transformations product that has been getting some attention over the last year.

kitchen before, Rustoleum Cabinet Transformations

We both love this outcome because they saved a ton o’ money, and because their perfectly solid oak cabinets are still in use, not in the landfill.  And, check out how the paint unified the crown molding, and made it look like it belongs to the cabinets.

She’s currently working on painting the island and swapping out the island counter for something a bit more updated.  But, wow, what a great transformation!  And I love the new cabinet pulls.  Great choice, for a bit of contrast.

Here’s what she said about the Rustoleum Cabinet Transformation product:  It took me about 1 week  to do, mostly while the kids were sleeping.  It isn’t hard, just very time-consuming.  The kit said it would only take 2 coats of the base coat, but it actually took me 3.  It is totally well worth it in the end.  My only minor concern is durability.  I noticed a couple of chip on the cabinet by the trash can…..it is very easy to touch up though.  I will say that I did drop a few of the cabinet doors on the garage door when I was trying to carry them in the house to reassemble.  Amazingly, they were okay!  Last night I started the island.  I was waiting to figure out what color but I ended up doing it the same color.  I didn’t feel like getting a new kit for an accent color since this is temporary.  All in all, it only took me 1 large kit to do the kitchen.

This would also be a great, economical option for staging an older home to sell.  This antique cream finish is very current.

If you have any questions about doing this kind of project, or any firsthand experience with this product, I would love to hear it.


Six Signs Your Kitchen is Outdated January 17, 2012

Filed under: One Day Interior Redesigns,Organizing — HeartWork Organizing @ 2:13 pm
Tags: ,

And so it begins.  I thought it was high time I did a kitchen series.  I’ll be sharing some of mine and others.  Here’s a few easy ideas to start out with.  Stay tuned for the next couple of weeks.  If you haven’t subscribed to the blog yet, what are you waiting for?  Look over to the side here and click subscribe, and get the goods immediately.

Even if your kitchen really is “experienced,” it doesn’t have to look old.  We don’t all have a big budget for major renovations, but these six easy and affordable fixes can ensure that your kitchen functions well and looks good, too.

1. A microwave sitting on the counter is not only a dead giveaway to the time since your last upgrade, it’s also a pretty easy fix. By moving it to where it belongs, within the line of upper cabinetry, it will expand the size of your kitchen by two and a half feet, at least on the countertop.  You probably have a hood above your range that holds a fan and light, which your new microwave will also have.  For about $200, you can get a nice microwave that has features such as the all important magic popcorn button.  For a little more, you can get the wonderful convection feature, that expands your cooking range, even browning meats and cooking breads without turning them to rubber.

2. If your fridge is over ten years old, not only will a new one provide a style update, but an energy lift as well.  According to one source, an older refrigerator might be costing you from $100/year to $280/year to operate than a newer model.  Replacing it with an energy efficient model can pay for itself in just a couple of years.

Want to see the other four? Check out the full article originally published at AboutOne.com.

Photo Credits:  ©HeartWork Organizing


Decorating Bookshelves December 27, 2011

Filed under: One Day Interior Redesigns,Organizing — HeartWork Organizing @ 2:00 pm
Tags: , ,

Your bookshelves can say a lot about you, if you know how to decorate them.  For inspiration with your bookshelves, look no farther than your favorite accessories or favorite accessory store.  That’s right, don’t limit yourself to books on your bookshelves.   Read the full article and use these bookcase decorating principles to create a bookcase you’ll love using things you probably already own.

Go from this:

Bookcases before

How to Decorate Bookcases- Before

Decorating Bookcases- After

Decorate Bookcases with Style- AFTER

Bookshelves Need Focal Points

Decorating bookshelves

Decorate Bookshelves with Room to Breathe

Play with Color

Stack and Stand

Relax

Add Lighting

Fill In Around the Edges

Whether you have a bank of built-ins, a stand-alone bookcase, or a few shelves to play with, arranging your bookcases with accessories you may already own can add miles of style to your home.  Read the full article for more on how to decorate bookcases.

Originally published in About One.

Photo Credits © HeartWork Organizing


Second Chance Decorating December 21, 2011

Filed under: Color With No Regrets,One Day Interior Redesigns — HeartWork Organizing @ 2:59 pm
Tags: , ,

Everyone deserves second chances, and that goes for good vintage furniture, too.  There’s something amazingly satisfying about repurposing something into a beautiful redesign.  Even if they aren’t old enough to be antiques, they are usually better quality that some items we find on the market today. When there is a chance to give a great piece a second life, and maybe save a few bucks, I’m all over it.

(If you find this post and the blog interesting, please click over on the side on the Subscribe button.  You’ll get fresh posts sent to your email or RSS feeds (your choice) as soon as they are hatched.)

This recent living room makeover is a great example.  If you didn’t see it, check out the wide shots of the room in the December 2011 newsletter.  Here are four of the items in the room, made over to be the perfect fit for the owner’s style.

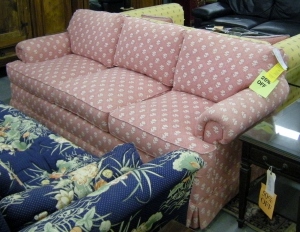
We spent 6 hours hunting for the perfect sofa.  Would you believe we found it?

Slipcovered sofa before

Are ya lovin’ it?  Trust me, despite the very, very pink exterior, the interior of this sofa is wonderful.   Full of feathers and the most comfortable sofa I’ve sat on in ages, the client got a steal at just $125.  Wanna see the after?

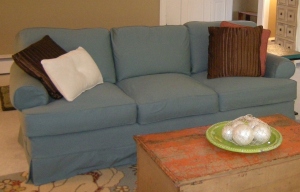
Slipcovered sofa

The beauty, of course, is that frame will likely outlast the slipcover, which can be changed in the future.  But it can also be washed, if need be.  Your regular  showroom sofa can’t pull that trick.

Then we we found a few other funky items, one of which captured my imagination.

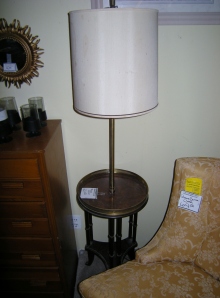
floor lamp needs a makeover

This floor lamp has bamboo-styled legs, which is a detail that I love in small doses.  But the brass trim was beaten up and the shade was a complete wreck.  Would you look twice at this beauty?

Chic black bamboo lamp

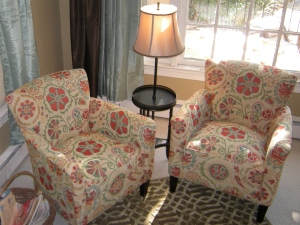
Several coats of black enamel were all it took to restore this lovely lamp.  Did I mention she was only $20 bucks to start?  And now nestled between two gorgeous, colorful and comfy chairs, she’s the perfect lamp table for the reading nook.

Here’s another transformation waiting to happen.  When I found these two club chairs and matching ottoman for only $150, I didn’t let the little bit of surface wear and ink stains throw me off.  You know there is a color change coming, right?

Club chairs waiting for slipcovers

With my favorite instant makeover tool, high quality stretch slipcovers, and a bit of work in the background, these “new” chairs fit right in.

club chairs with slipcovers

The last of the second chances I’ll show you here is a bright pop of color.  With just a teensy bit of repair, we repurposed this old chest into the room’s coffee table.  If I told you I was bringing a beat up old orange trunk into this room with a grand piano, would it make sense?  But this one, which once might have been a foot locker or fishing tackle storage for all I know, looks right at home in this warm place for one of my favorite families to gather.

I hope you enjoyed seeing these items we used in this second chance decorating project.  Are there vintage items in your home or at your local thrift shop that can be fabulous with just the right touch?


How to Decorate an Office for the Holidays December 15, 2011

Filed under: Business Organizing,One Day Interior Redesigns — HeartWork Organizing @ 1:22 pm
Tags: ,
Decorating an office for the holidays

If you want to stick with traditional, use on hand materials to customize office decorations.

Decorating an office for the holidays can put co-workers, employees and customers in festive spirits without feeling commercialized.  You can use these same tricks to make your home decorating beautiful and personal.  I like to keep it as green as possible, as affordable as possible, customized, and classic.  Click here for the full article on how to decorate your office this year, or use these same easy principles to decorate for any holiday.

Decorating for Holidays beyond red and green

You can step outside traditional red and green to create custom decorating themes for an office.

Whatever you do to decorate your office, enjoy this opportunity to share a bit of your own style for the holidays.

This post originally published in About One.


The Skinny on Wood Blinds and Plantation Shutters December 13, 2011

Filed under: One Day Interior Redesigns — HeartWork Organizing @ 2:00 pm
Tags:
Wood shutters for the kitchen

Plantation Shutters in the Kitchen

Wood blinds are a hot item these days. Very trendy and durable. The more upscale trend is plantation shutters. From the street, blinds and plantation shutters can both look very similar. Both are available in real and faux wood. Plantation shutters usually don’t even require top treatments or curtains.  Don’t be afraid of the “faux”.  If you get the better quality from a major manufacturer, you won’t be able to tell the difference between wood and composite materials.

Learn more about the finer points of wood blinds and plantation shutters.  Consider the width, safety features, where to buy, installation and maintenance.  They are in a different class from other window treatments, since they tend to be considered more durable, more neutral, and less dependant on personal tastes like fabric choices are.  An investment in good quality (real or faux) wood blinds and shutters is generally a good investment for your home.

Photo Credits:  ©HeartWork Organizing

Originally published in at AboutOne.


Lighting Matters When Decorating November 29, 2011

Filed under: Color With No Regrets,One Day Interior Redesigns — HeartWork Organizing @ 2:00 pm
Tags: ,

A friend and I are picking items for her new kitchen, and we were reminded again today to use the one criteria most taken for granted-lighting, anywhere and everywhere.

Outside lighting on a kitchen backsplash

My friend, I’ll call her Celia, did a great job of picking seven different floor samples to take home to try out. On her way out of the store, she spotted the perfect, to die for, colorful tumbled stone backsplash (see photo above). I cautioned Celia that she was seeing her picks in a huge warehouse store with terrible fluorescent lighting, and they were picking up colors of samples around them, not the colors they will be picking up in her kitchen.

The minute we walked out of the store, we saw all of the samples turn shades. Eew. Some of the items went pink, some went orange, some of them lost their color altogether.

A few hours later, I got an interesting email from Celia. Her colorful stone backsplash went drab at home. The darkest floor tile sample that was sure to be rejected in her light-starved kitchen turned out to be her most favorite and most colorful.

Was this shopping trip a failure? Not at all. We have options to improve the lighting that will restore the shine and color to the backsplash, and we both agree that it still reflects her style. And by spending that time in the warehouse store looking at all available samples, Celia has also zeroed in on qualities for the floor tile that previously knocked out several contenders.

So next time you are shopping for decorating choices, watch out for big spaces, bad lighting, and snappy judgements. Take samples home and see what they say to you in the lighting where they will live. Let me know how it goes.


How to Decorate Mudrooms November 8, 2011

Filed under: One Day Interior Redesigns,Organizing — HeartWork Organizing @ 11:50 pm
Tags: , ,

The mudroom or entry way to your home is probably the hardest working space in the house.  Decorating a mudroom can be a challenge because the space is usually small, multi-tasking, and heavily used.  If you have kids or dogs, an entry hall or mudroom can be a disaster waiting to happen.  It helps to know how to pick paint for high traffic areas and a few other tricks when decorating a mudroom.

how to pick paint; choosing paint; decorating a mudroom; mudrooms

Read more about how to choose the best paint, furniture, lighting and accents for your mudroom at the originally published location for How to Decorate Mudrooms.


Photo credit and © HeartWork Organizing 2011.

Originally published in www.blog.AboutOne.com.


How to Have an Art Room of One’s Own October 18, 2011

Filed under: One Day Interior Redesigns — HeartWork Organizing @ 9:20 pm
Tags: , , ,

Doing design work for artists is some of the most intimidating and rewarding work that I do.  Many people think that if they are good at some things, they should be good at all things.  Not so.  My recent collaboration with a collage artist shows this in action.  She is absolutely fabulous with her collage and mixed media art, but her spaces were not showing her personal style.  While I can make her room sing, I couldn’t collage like she can to save my life.  I often found myself gazing at her creations, which is kind of unusual for me since I’m surrounded by so many gorgeous influences all day long.  But she needed a little help to turn her unused bedroom into a space that she ended up calling something special.  Read to the end to hear what she thought of her transformed space.

Before:

After:

Closet Storage before:

Closet storage after; even this can be a gallery space.

Window treatments needed to say something more interesting than the before:

So the window got a fresh new simple treatment:

Of course the office side needed a facelift, too:

And the whole space became more organized and calm:

Can’t decide if my favorite part is the pretty organization…

the stylish cork memo board circles…

Or the Dynamic Frames gallery

She can update these just by flipping open the fronts and presto-chango updating her portfolio…

Perfect for displaying the client’s own works and her favorite things.

Her final judgement:  the space is cheerful, fresh and original.  Just the sort of space to inspire more beautiful creations.


How To Customize a Roller Shade with Paint September 5, 2011

Filed under: One Day Interior Redesigns — HeartWork Organizing @ 3:30 pm

Rather than throw out that plain old vinyl roller shade when upgrading your room, why not paint it and customize it for your decor?  Here, I’ll show you how.

This roller shade started out a boring white but functional specimen.  I began by rolling it open on a relatively flat surface that was protected by a dropcloth.  It’s best to do this outside and away from the house because spray painting is very messy.

First, lightly spray the entire surface with a primer.  Here I used gray primer because I’m going for a gray finish product.  Remember, when working with spray paint, use a very light and consistent spray.  Several light coats give better coverage than a single heavy coat.

After the primer dries, sweep or brush the primer to remove any dust or flakes.  Be careful not to step or lean on the primed surface as you will leave a mark.

Use masking tape to create your pattern.  I was mimicking a grid pattern from my valence, so I marked off a grid roughly twice the scale of the fabric grid.  In this example, I used grid lines 8″ apart from each other.  Laying a yardstick alongside the tape helps to keep it straight when laying out the lines.

Do your best to adhere the tape flat to the primed surface, since gaps will allow the paint to bleed and soften your lines. This is trickier than it sounds, since tape won’t adhere well to a primed surface.  I tried both green Frog tape and 3M Delicate Surface low tack tape.  The blue tape barely stuck and didn’t pull up any of the primer, while the Frog tape stuck a little too well.

Once all the tape lines are laid, apply a thin coat of spray paint.  Here I used Rustoleum High Heat silver paint, leftover from another project, but with a nice sheen to it.

Let this coat dry at least an hour, then apply a second coat if desired.  Here, I added a coat of Krylon Stainless Steel finish, to add more gray sheen.

Carefully remove the taped lines, being sure not to lean on the finished product. 

The stainless paint finish leaves tiny flakes, so lightly brush or sweep it again.

That’s it.  You don’t need many supplies for this little project.

The finished product has an antiqued look to it, but is still quite flexible and operates on the roller pins wonderfully.


How to Get the WOW Factor in Just One Day July 30, 2011

Filed under: One Day Interior Redesigns — HeartWork Organizing @ 8:03 pm
Tags: , , ,

Color.  Need I say more?  Just a little.  Just the right values.  Just the ones that will highlight the stuff you already own.  Improve the lighting.  And a little shimmer never hurts.  See for yourself.

Before


After

Same furniture.  Same rug.  A whole new attitude.  If the entry into your home isn’t saying wow, please call me. We can help.